AVL Tree의 노드를 삭제한 이후에도 재배열 과정을 거쳐야 한다.
재배열 과정에서 지켜야할 규칙은 이전 블로그에서 기록한 내용과 동일하다.
T1, T2, T3는 루트노드 y 또는 x의 자식트리이다. (y는 왼쪽, x는 오른쪽 트리)y x/ \ Right Rotation / \x T3 – – – – – – – > T1 y/ \ < - - - - - - - / \T1 T2 Left Rotation T2 T3두 트리에서 지켜야 할 데이터 크기의 순서는 아래와 같다.keys(T1) < key(x) < keys(T2) < key(y) < keys(T3)
삭제의 순서
노드 w를 삭제한다고 할 때, 순서는 아래와 같다.
- BST의 삭제 방법과 동일하게 노드 w를 삭제한다.
- w 노드로부터 불균형한 첫번째 노드를 찾는다. 첫번째 불균형 노드를 z라고 한다. y는 z의 자식노드들 중 깊이가 큰 자식노드라 하고, x는 y의 자식 노드들 중 깊이가 큰 노드라 하자. (노드의 기준이 삽입과 다르다)
- z을 루트로 하는 자식트리를 재배열한다. 재배열 작업 시 4가지 케이스는 삽입과 동일하다.
a) y는 z의 왼쪽자식, x는 y의 왼쪽자식 (left left)
b) y는 z의 왼쪽자식, x는 y의 오른쪽자식 (left right)
c) y는 z의 오른쪽자식, x는 y의 오른쪽자식 (right right)
d) y는 z의 오른쪽자식, x는 y의 왼쪽자식 (right left)
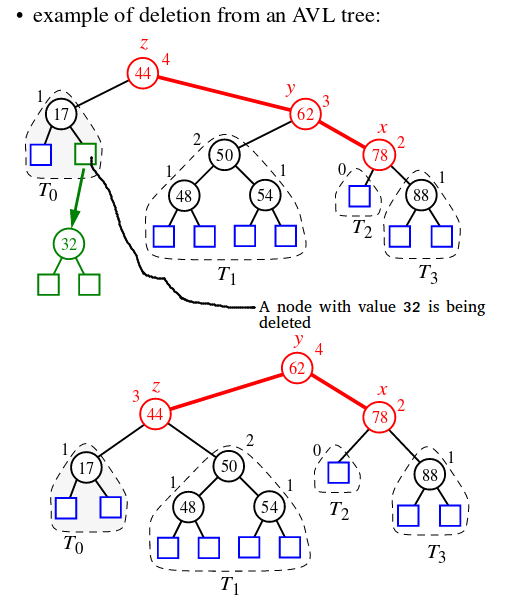
[그림 1] AVL Tree 삭제 예시
[그림 1]은 AVL Tree의 삭제 과정을 보여준다. 32을 삭제한 이후, 불균형한 첫번째 노드 44(z)을 찾았고, 깊이가 높은 자식 노드 62(y), 손자노드 78(x)을 찾아 right rkght case의 재배열 과정을 거쳤다. 재배열 시 left rotation을 수행하여 균형을 갖춘 AVL Tree의 성질을 유지하였다.
아래 코드는 삭제를 수행하는 부분만 구현된 부분이다. AVL Tree의 표현과 삽입은 이전 블로그를 참고하자.
private Node delete(Node root, int key) {
    if (root == null) {
    	return root;
    }
    // The key to be deleted is compare root's key.
    if (key < root.key) {
    	root.left = delete(root.left, key);
    } else if (key > root.key) {
    	root.right = delete(root.right, key);
    }
    // If key is same as root's key, then this is the node to be deleted.
    else {
    	if ((root.left == null) || (root.right == null)) {
        	Node temp = null;
            if (temp == root.left) {
            	temp = root.right;
            } else {
            	temp = root.left;
            }
            // No child case.
            if (temp == null) {
            	temp = root;
                root = null;
            }
            // One child case.
            else {
            	root = temp;
            }
        } else {

        /*
            node with two children: Get the inorder
            successor (smallest in the right subtree)
        */
        Node temp = minValueNode(root.right);

        // copy the inorder successor's data to this node.
        root.key = temp.key;

        // delete the inorder successor.
        root.right = delete(root.right, temp.key);
        }
    }
    // If the tree had only one node then return.
    if (root == null) {
        return root;
    }


    // STEP 2 : update height of the current node.
    root.height = Math.max(height(root.left), height(root.right)) + 1;

    // STEP 3 : get the balance factor of this node (to check whether this node bacame unbalanced)
    int balance = getBalance(root);
    if (balance > 1 && getBalance(root.left) >= 0) {
        return rightRotate(root);
    }
    if (balance > 1 && getBalance(root.left) < 0) {
        root.left = leftRotate(root.left);
        return rightRotate(root);
    }
    if (balance < -1 && getBalance(root.right) <= 0) {
        return leftRotate(root);
    }
    if (balance < -1 && getBalance(root.right) > 0) {
        root.right = rightRotate(root.right);
        return leftRotate(root);
    }
    return root;
}
[참고]
반응형
'Algorithm' 카테고리의 다른 글
| Raft 알고리즘 요약 (0) | 2023.03.30 |
|---|---|
| AVL Tree (1) - 개념, 삽입 (0) | 2017.08.24 |
| [algospot] 조세푸스 문제 (연결리스트) (0) | 2017.08.03 |
| [Euler] Highly divisible triangular number (0) | 2016.03.25 |
| [분할정복] 카라츠바 알고리즘 (0) | 2014.06.21 |